
A Surprising Concept

The following example made a strong impression on me. I have studied rook endgames since my youth and I can say that I know the basic ideas and concepts that are used when playing for a draw or win. That is why the position below was an eye opener for me.
Before continuing I have to say that I discovered this example when it was mentioned on Facebook, I cannot remember who exactly mentioned it, but the correct way to play was pointed out by GM Boris Avrukh.
The position on the diagram is from the game Xiong-Swiercz from the USA Championship in 2021. White just captured the pawn on a6 and we have a fairly typical rook endgame with an extra pawn on the a-file.
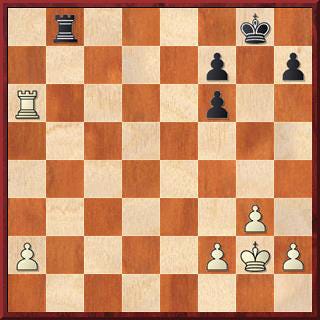
To quickly state the typical development according to theory - Black places the rook actively, for example on b2, tying down White’s rook on the a-file. When White advances the a-pawn then the rook is placed behind the pawn on the a-file and the typical scenario is that White at some point sends his king to the queenside to help the passed pawn (usually placed on a6 by that time). Black in the meantime collects a pawn or two on the kingside and creates counterplay there. Eventually he sacrifices the rook for the a-pawn when a promotion is inevitable, but the counterplay on the other side of the board should suffice for a draw.
In the position above, the key detail is the word “fairly” that I used above - the difference between the standard theoretical developments is the fact that Black has doubled pawns on the f-file instead of the more common pawns on the h, g and f-files.
You probably guessed it by now, this makes the whole difference in a very surprising way. I have to admit that the idea is quite unexpected, so it’s no wonder that both players missed it.
The idea is that in fact White is winning in the position of 3 vs 2 on the kingside if he takes the pawn on f6 and manages to keep the rook there!
To illustrate: in the game Black played the natural 36...Rb2? after which White could have won (he played the natural 37.a4? which after 37...Ra2 led to the standard scenario desribed above) with 37.Rxf6!! Rxa2 38.g4!! with the idea of 38...Kg7 39.g5.
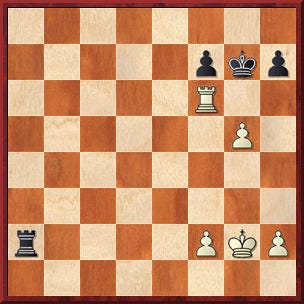
Then, as Avrukh indicates, he advances with h4-h5-h6 and f4 and either forces an exchange of rooks on the 8th rank or forces a breakthrough with f5 and g6. Have a look at this, it’s a great exercise to analyse this position following this winning plan.
Knowing this, it’s easy to figure out the best play for both sides: Black’s only move to survive is 36...f5! Then if White goes after the f-pawn with 37.Rf6 Ra8 38.Rxf5 Rxa2
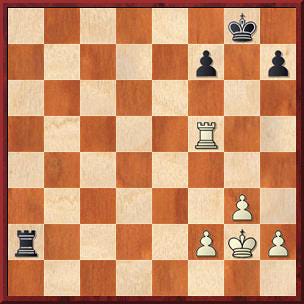
We can see the difference - the rook is on f5 and not on f6 so White doesn’t have the time to establish it there by Rf6 and g4-g5, thus giving Black an easy theoretical draw in this 3 vs 2 position.
It is really incredible to know that this particular position with 3 vs 2 on the same wing can be winning, so my thanks goes to Avrukh for discovering this. I would have imagined that all there was to know in theoretical rook endgames was already known, but chess again managed to surprise me with its depth.
If you found this endgame analysis helpful and want to see how I approach training as a whole, I recently released The Method. It’s the first time I’ve shared the specific habits and routines that took me to the Grandmaster title - designed for players who need a clear direction on how to study.
P.S. This week’s video is on a surprising concept in the Grunfeld Defence. In one of the oldest lines against this opening, the early 9.d5 push was never considered critical. It may still not be, but it does pose practical questions to the second player. Take a look and if you like it, feel free to include it in your repertoire!
What a beautiful chess concept, and very important one in practice, because according to statistics, the rook endgames are most frequent. Thank you! 🤩